The exam screen allows you to select content to create and view assessments.

The top bar title shows the current exam name and version (Manual (v1)).
If the exam version is still a draft, it will be indicated by ‘Not Approved’ to the title, and an info icon in the top bar will reveal more information about the exam version.
You can find more about this in the Exam section of the manual.
Create Assessment
The top area of the exam screen provides the functionality to select the content needed to evaluate an assessment.
To create a new assessment, select an examiner, a form, and the candidate.
You can select the content in multiple ways:
- Scan a QR Code to select the record with the centered button.
- Select a record using a picker by tapping on the respective button.

The record picker will show a list of the content to choose from. You can scroll and search to find the record needed.
Examiner and candidate records are always labeled with the last name (bold) and the first name and are ordered by last name.
If an examiner/candidate has an id, it will be added in brackets, and if a form has a case number defined, it will be equally shown after the form name.
Depending on the Project Settings, it might be forbidden to select a record using the picker; however, scanning the QR Code is always possible.
Next to the form selection is a preview icon. This allows you to take a look at the form.
Important: No data will be stored when making selections in the form preview!
Once the 3 fields are filled out, tap on Assess Candidate to start the assessment.
Manage Assessments

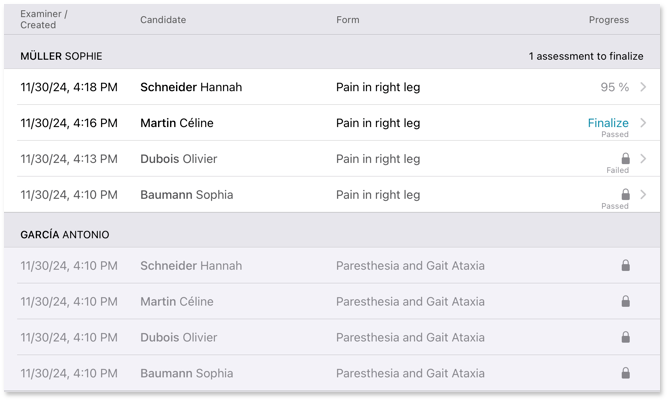
Once assessments have been created, the assessment list will display all of them grouped by examiner name. The assessments of the currently assessing examiner always appear on top. The order of the assessment is by creation date descending.
Depending on the Project Settings, an examiner might or might not be allowed to open assessments made by other examiners.
An assessment which can be opened is indicated by an arrow (>) on the right side of its row. An assessment which cannot be opened has no such arrow and is greyed out.
Additionally, the pass/fail outcome might be displayed below the progress. It is only shown for assessments the current examiner can open.
Finalize Assessments
Note: When all assessments are finished, the examiner has to finalize the assessments.
To do so, the examiner can finalize the assessment in the assessment screen or in bulk on the exam screen.
To finalize in bulk, tap the Finalize All button on the top right of the exam screen.
Depending on the configuration, finalizing in bulk might not be allowed.
Depending on the Project Settings, examiners might be required to sign the assessments.
In such a case, a signature overlay will prompt the examiner to sign when finalizing.
